SpringSource Tool Suite で Spring MVC から Spring JDBCを利用したコードを書く
基本的に、上記の本を参考にしつつ。
SpringSource Tool Suite(STS) の導入~簡単なアプリケーションの作成 で作成した、Spring MVC のスケルトンアプリに、Spring JDBC を利用したコードを組み込んでみる。
Java 標準の JDBC をそのまま使うと、以下の様な点が問題になる。
- Connection,Statement,ResultSet インスタンスの管理などプログラミングが大変。
- すべての例外がSQLExceptionであるため、例外処理が煩雑。
- Connection インスタンスの取得の仕方がいろいろあり、環境により記述が変わる。
Spring JDBCを利用することで、
- Connection のインスタンス管理を行ってくれる。
- SQLException ではなく、汎用データベースアクセス例外が提供されているので、SQLStateを調べずに、例外の型による処理が可能。
- Connection の取得は、DIにより一貫した取得方法が提供される。
ということになる。
Spring JDBC への参照設定
Spring Template Project - Spring MVC Project を作成すると、Spring JDBC への参照設定はなされていない。
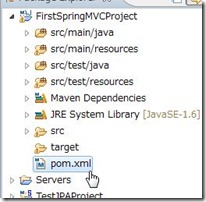
Maven の設定ファイル、pom.xml の dependencies 要素に、Spring JDBC の記述を追加する。
<dependencies>
    <!-- JDBC -->
    <dependency>
        <groupid>org.springframework</groupid>
        <artifactid>spring-jdbc</artifactid>
        <version>3.0.0.RELEASE</version>
        <scope>compile</scope>
    </dependency>
</dependencies>
JDBC ドライバの準備
https://www-304.ibm.com/support/docview.wss?rs=4020&uid=swg27016878
から、Driver for JDBC and SQLJ をダウンロード、解凍すると、db2cc4.jar とうJDBCドライバがあるので、ダウンロード。
Mavenのローカルリポジトリに登録
ここを参考に、ローカルリポジトリにDB2 JDBC4 ドライバをインストールしてみる。
mvn install:install-file -Dfile=<path-to-file>
                         -DgroupId=<group-id>
                         -DartifactId=<artifact-id>
                         -Dversion=<version>
                         -Dpackaging=<packaging>
設定値などは適当。適当なフォルダにJDBCドライバを置き、path-to-file に指定。mvnコマンド自体は、STSインストールにより、C:\springsource\maven-2.2.1.RELEASE\bin にインストールされていた。
実行。
>C:\springsource\maven-2.2.1.RELEASE\bin>mvn install:install-file -Dfile=C:\Users\piroto\maven_local_lib\db2Jcc4.jar -Dgr
oupId=db2jcc4 -DartifactId=db2Jcc4 -Dversion=9.7 -Dpackaging=jar -DlocalRepositoryPath=C:\Users\piroto\.m2\repository
[INFO] Scanning for projects...
[INFO] Searching repository for plugin with prefix: 'install'.
[INFO] ------------------------------------------------------------------------
[INFO] Building Maven Default Project
[INFO]    task-segment: [install:install-file] (aggregator-style)
[INFO] ------------------------------------------------------------------------
[INFO] [install:install-file {execution: default-cli}]
[INFO] Installing C:\Users\piroto\maven_local_lib\db2Jcc4.jar to C:\Users\piroto\.m2\repository\db2jcc4\db2Jcc4\9.7\db2J
cc4-9.7.jar
[INFO] ------------------------------------------------------------------------
[INFO] BUILD SUCCESSFUL
[INFO] ------------------------------------------------------------------------
[INFO] Total time: 3 seconds
[INFO] Finished at: Thu May 19 22:38:44 JST 2011
[INFO] Final Memory: 4M/109M
[INFO] ------------------------------------------------------------------------
めでたくインストールできたので、Spring JDBC同様、pom.xml に追記。
<dependency>
    <groupId>db2jcc4</groupId>
    <artifactId>db2jcc4</artifactId>
    <version>9.7</version>
</dependency>
これでJDBCを使う準備は整った。
エンティティクラスの実装
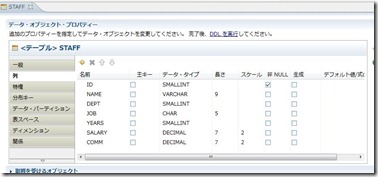
DB2のサンプルデータベースのSTAFFテーブルの定義を見ながら、Java のクラスを作成。
public class Staff {
    private Integer id;
    private String name;
    private Integer dept;
    private String job;
    private Integer years;
    private Double salary;
    private Double comm;

    @Override
    public String toString() {
        return String.format("%d,%s,%d,%s,%d,%f,%f",
                this.id,
                this.name,
                this.dept,
                this.job,
                this.years,
                this.salary,
                this.comm);
    }
    public Integer getId() {
        return id;
    }
    public void setId(Integer id) {
        this.id = id;
    }

       :
}
DAOクラスの作成
Staff 取得用のインターフェース
package info.typea.firstspringmvc.dao;

import java.util.List;

import org.springframework.dao.DataAccessException;

public interface StaffDao {
    List getStaffList() throws DataAccessException;
}
Staff 取得の実装クラス
package info.typea.firstspringmvc.dao;

import java.sql.ResultSet;
import java.sql.SQLException;
import java.util.List;

import org.springframework.dao.DataAccessException;
import org.springframework.jdbc.core.JdbcTemplate;
import org.springframework.jdbc.core.RowMapper;
import org.springframework.jdbc.core.support.JdbcDaoSupport;

public class StaffDaoImpl extends JdbcDaoSupport implements StaffDao {

    @Override
    public List getStaffList() throws DataAccessException {
        RowMapper rowMapper = new StaffRowWraper();
        return getJdbcTemplate().query("SELECT * FROM staff", rowMapper);
    }

    protected class StaffRowWraper implements RowMapper {

        @Override
        public Staff mapRow(ResultSet result, int row) throws SQLException {

            Staff staff = new Staff();
            staff.setId(result.getInt("ID"));
            staff.setName(result.getString("NAME"));
            staff.setDept(result.getInt("DEPT"));
            staff.setJob(result.getString("JOB"));
            staff.setYears(result.getInt("YEARS"));
            staff.setSalary(result.getDouble("SALARY"));
            staff.setComm(result.getDouble("COMM"));
            return staff;
        }
    }
}
依存性を注入
この状態で、いわゆるひとつの疎結合状態になっているので、設定ファイルで依存性をちゅーにゅーする。
実装クラスの基底クラス JdbcDaoSupport は、DataSource のセッターをもっていて、セットされたDataSource を元に、データベースに対する処理を行うようになっている。
root-context.xml の beans 要素の中に、dataSource を定義。ここに、JDBCの接続設定も記述しておく。
そして、DAOの実装クラスのdataSource プロパティに、上記で定義した、DataSourceを注入。
<bean id="dataSource"
    class="org.springframework.jdbc.datasource.DriverManagerDataSource">
    <property name="driverClassName">
        <value>com.ibm.db2.jcc.DB2Driver</value>
    </property>
    <property name="url">
        <value>jdbc:db2://192.168.10.77:50000/sample</value>
    </property>
    <property name="username">
        <value>db2inst1</value>
    </property>
    <property name="password">
        <value>zzzzz</value>
    </property>
</bean>

<bean id="staffDao"
    class="info.typea.firstspringmvc.dao.StaffDaoImpl">
    <property name="dataSource" ref="dataSource" />
</bean>
コントローラに、DAOを注入
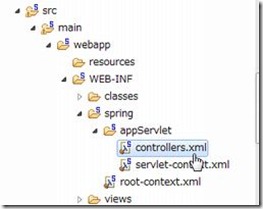
controllers.xml に、HomeController に 今作成したDAO を注入する記述をする。
    <bean id="homeController"
        class="info.typea.firstspringmvc.controllers.HomeController">
        <property name="staffDao" ref="staffDao"/>
    </bean>
使ってみる
最初のサンプルアプリを作成した時のコントローラーで、ログを吐いている箇所を、データベースの結果を出力するように書き換える。
package info.typea.firstspringmvc.controllers;

import info.typea.firstspringmvc.dao.Staff;
import info.typea.firstspringmvc.dao.StaffDao;

import java.util.List;

import org.springframework.stereotype.Controller;
import org.springframework.web.bind.annotation.RequestMapping;

@Controller
public class HomeController {
    private StaffDao staffDao;
    public void setStaffDao(StaffDao staffDao) {
        this.staffDao = staffDao;
    }

    @RequestMapping(value="/")
    public String home() {

        List stafflist = this.staffDao.getStaffList();

        for (Staff staff : stafflist) {
            System.out.println(staff.toString());
        }
        return "home";
    }
}
実行
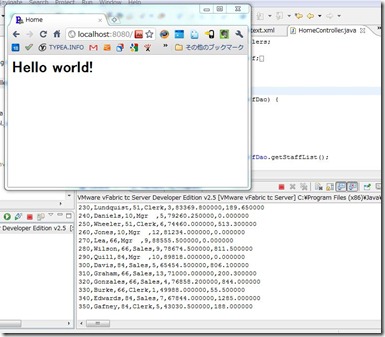
DB2を起動して、実行。
取得できた!
いくつになっても、DBから値がとれてくるのはうれしいもんですね。


